If you develop an iOS app, you know this: Creating screenshots is a lot of work. You need updated screenshots for all your device types in all your languages, and manually creating all those takes a long time.
Lots of people are using fastlane to create their screenshots, but for a variety of reasons, I decided against it. I had tried it out before, but it doesn’t really fit into my development workflow, and it feels like too much for just taking screenshots.
Fastlane uses XCUITest to take screenshots anyway, so I decided to try out if I could recreate the functionality of fastlane snapshot without using Ruby, without installing any gems, and without having to buy into the fastlane ecosystem.
My goal: Write an Xcode UI Test that takes screenshots, then extract and collect those screenshots for all languages and devices into a folder on my Desktop. I’m going to use my own app, Libi, as an example.
After some fiddling, here are my results.
Overview over the Process
Here are the steps we need to take:
- Run Xcode UI Tests that take screenshots
- Run the Tests from the command line
- Extract those screenshots from the test logs
- Run those steps for each combination of device and language.
Below are my solutions to all 4 steps, plus some addenda that make things easier. If you’re stuck, read through to the bottom to see if a solution to your problen is already there.
First Step: Run Xcode UI Tests that Take Screenshots
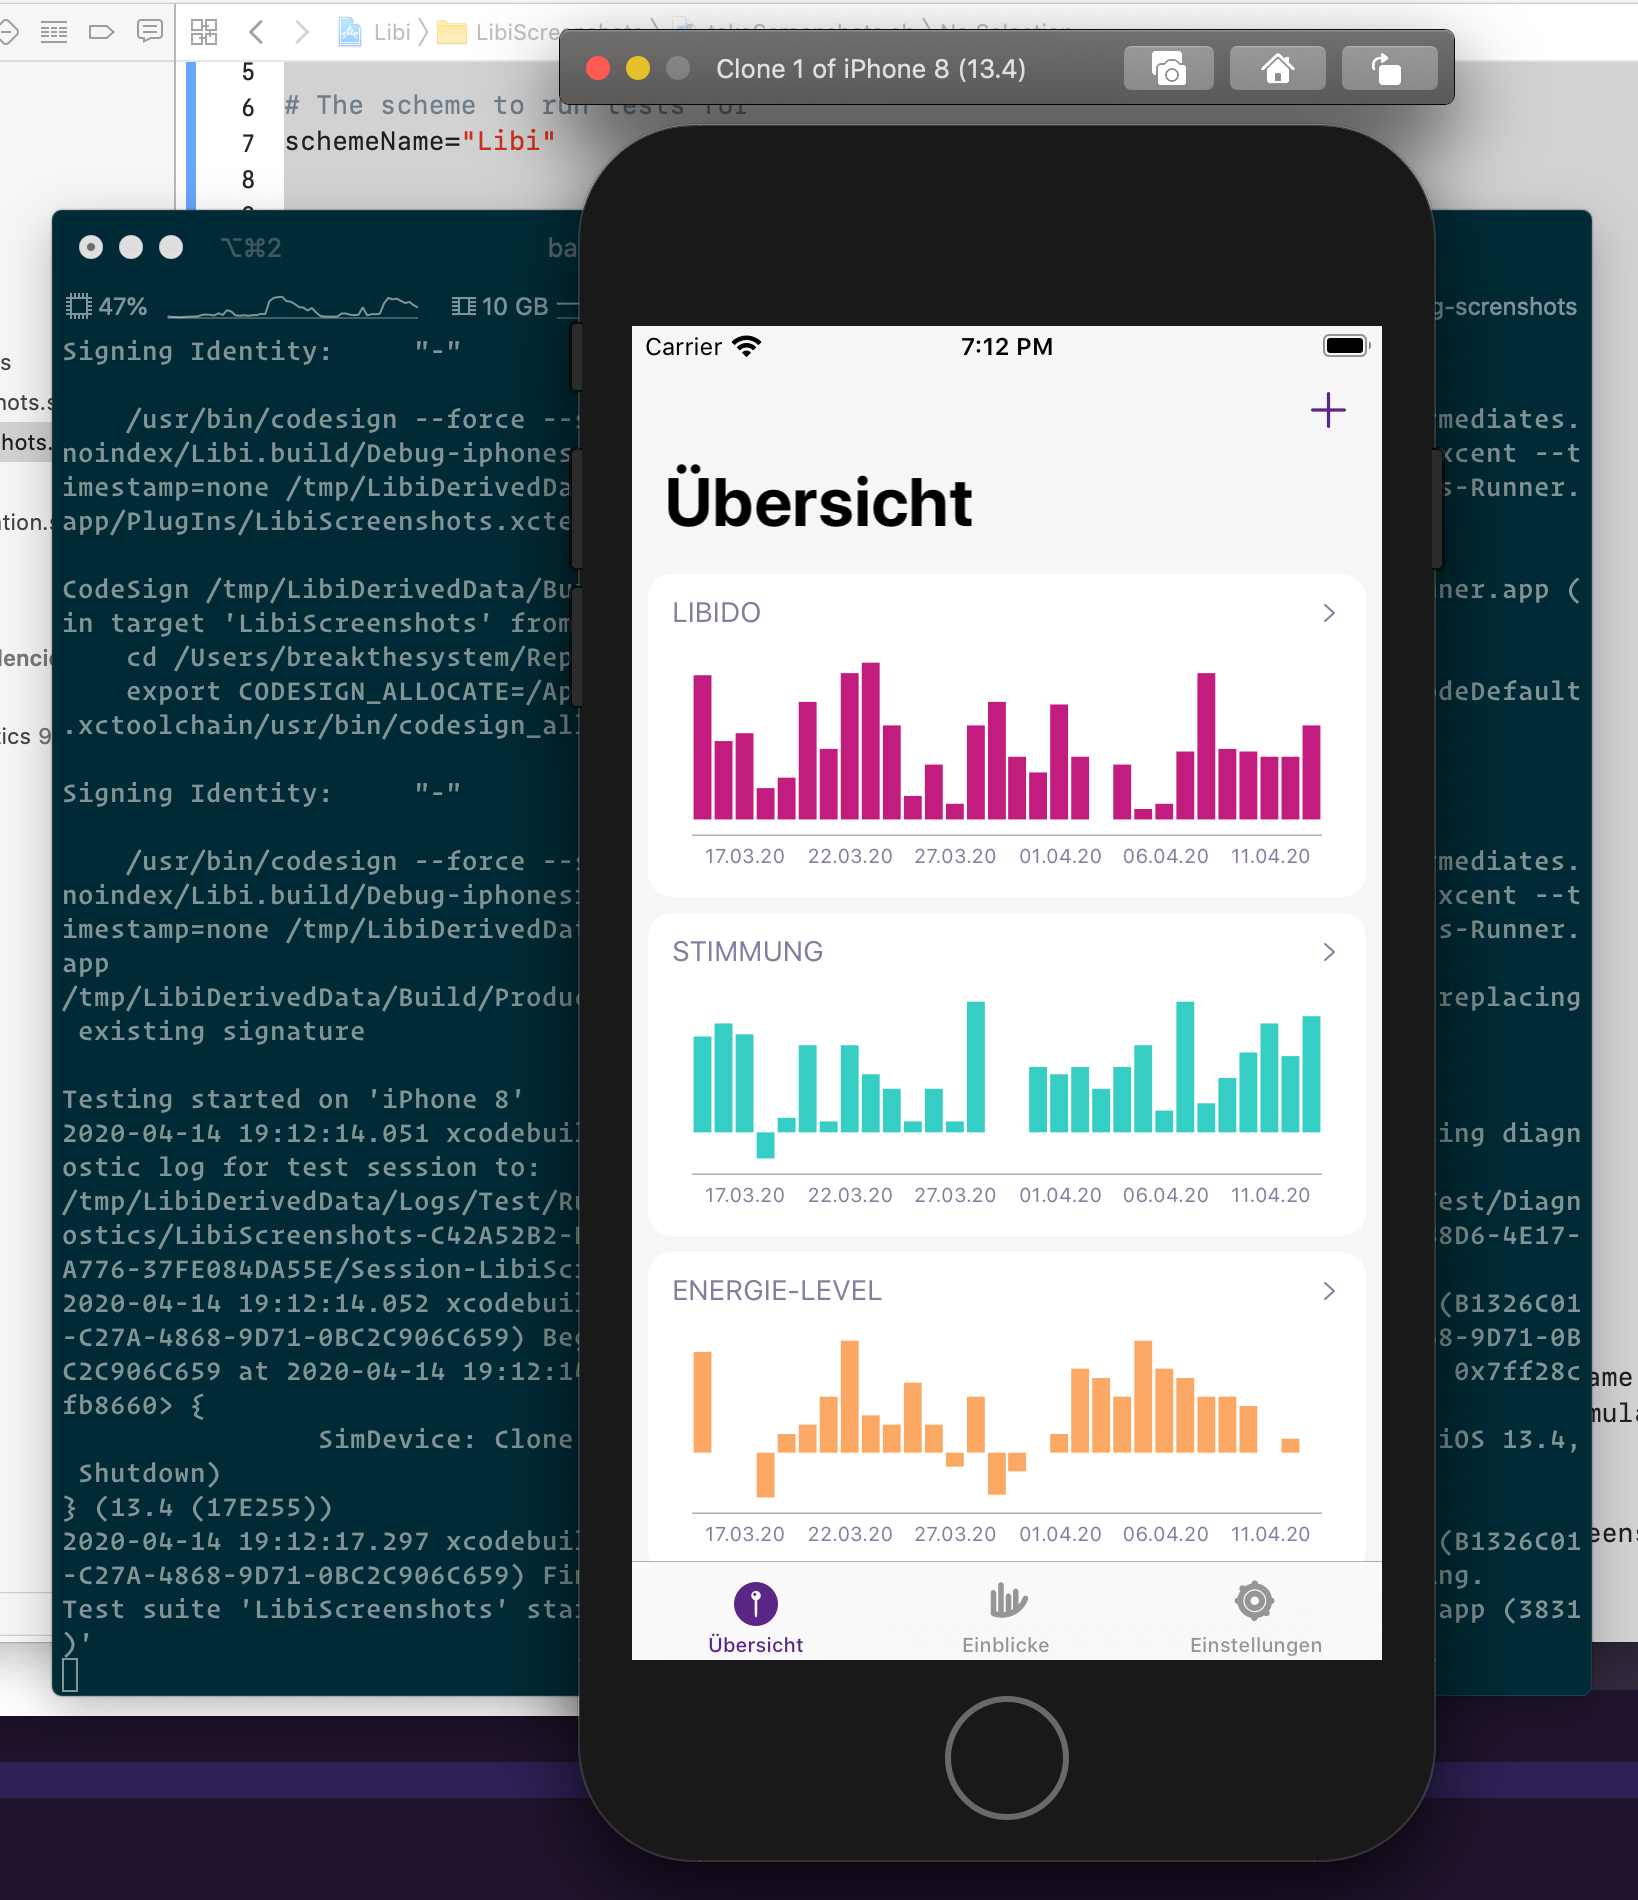
Just a quick sneak preview, here is how things should look like at the end:
Setting Things up
Even if you already have an UI Testing Target, you should probably create a new one for your screenshots. If you do not have an UI Testing Target, welcome to the world of UI testing!
- In Xcode, go to
File > New > Target...and select “UI testing bundle”. - Call the Bundle something like “YourAppScreenshots” and click “Finish”.
- Edit your app’s scheme to run your UI tests when testing: Go to
Product > Scheme > Edit Scheme...click on “Test” in the sidebar, and enable your new bundle. (Newer Xcode versions might already have it enabled, so no need to do anything in this case)
Create a Test
Add a new property to your test class to keep track of the XCUIApplication:
var app: XCUIApplication!
then initialize the app property in your setup method:
override func setUpWithError() throws {
    continueAfterFailure = false
    app = XCUIApplication()

    // We send a command line argument to our app,
    // to enable it to reset its state
    app.launchArguments.append("--libiScreenshots")
}
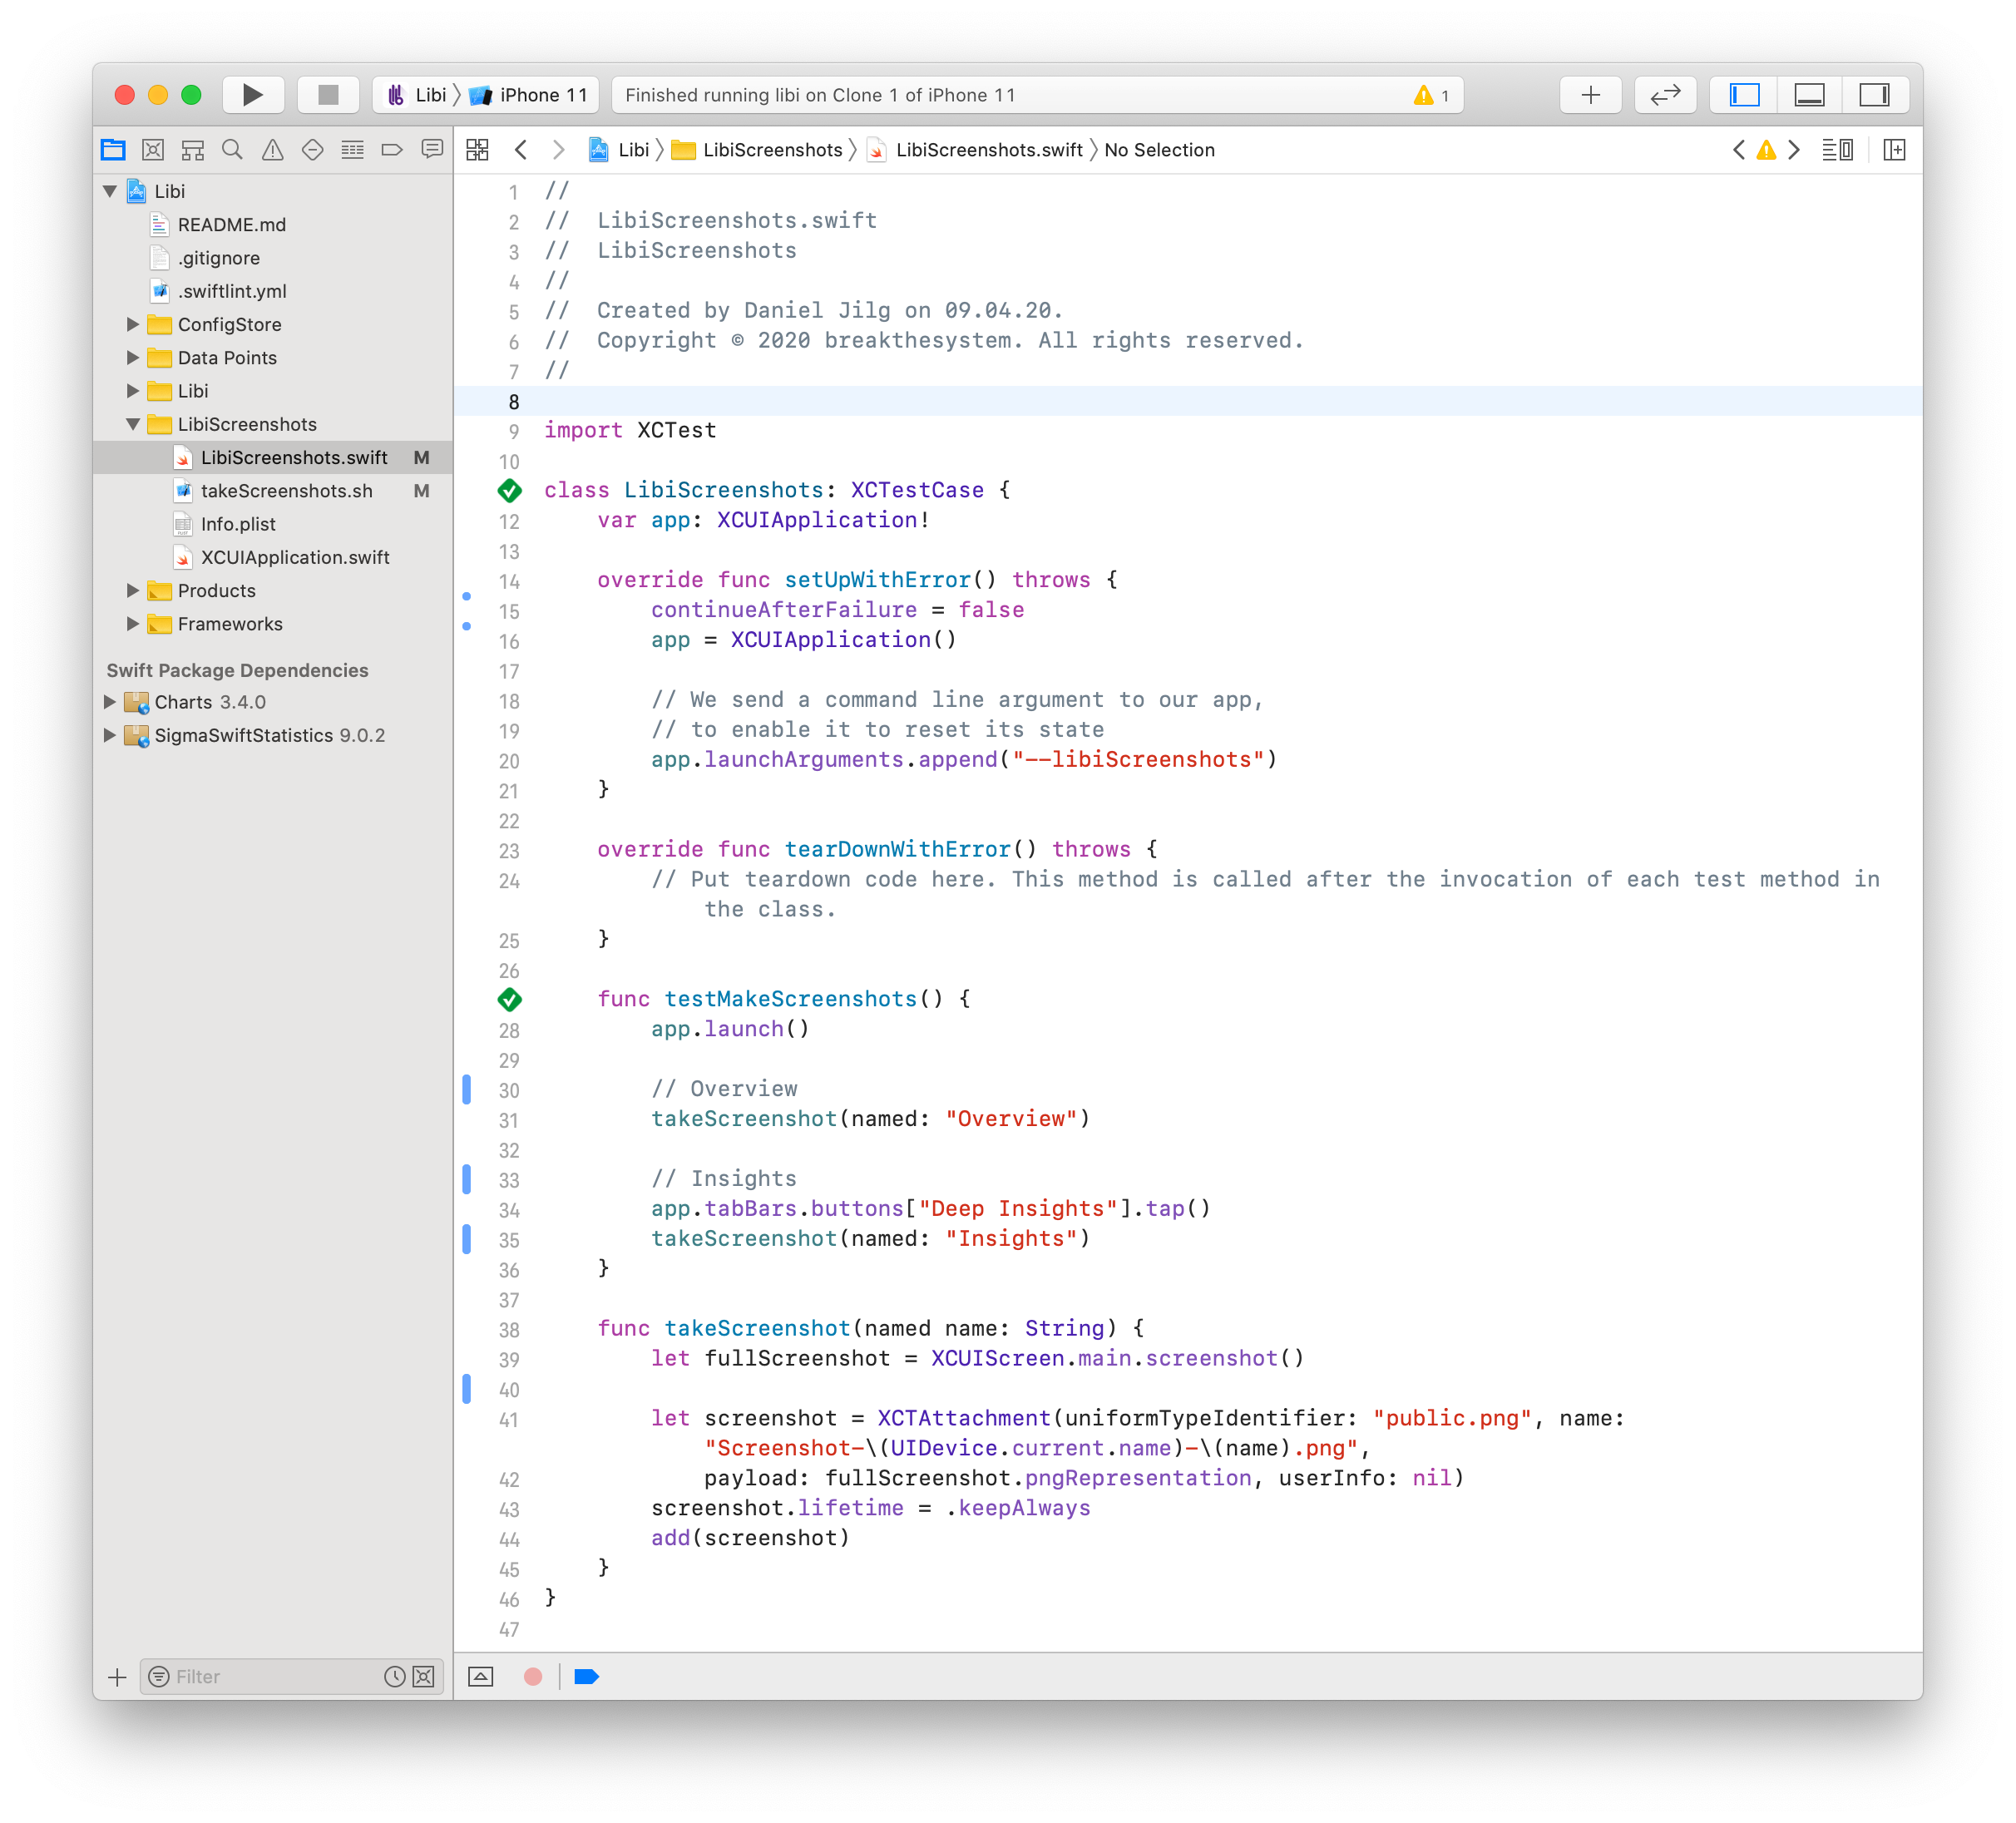
Now you can create your first test. I put the whole screenshot flow into one test, but might split individual flows off into their own test functions later:
func testMakeScreenshots() {
    app.launch()

    // Overview
    takeScreenshot(named: "Overview")

    // Insights
    app.tabBars.buttons["Deep Insights"].tap()
    takeScreenshot(named: "Insights")
}
This test uses a function I wrote, takeScreenshot(named:), which extracts the correct way of taking screenshots in our situation. See below for the function code.
testMakeScreenshot function and click the little 🔴 record button in the bottom toolbar. This will launch your app in the simulator and then record your taps there as code inside the test function. Click the record button again to stop.
accessibilityIdentifier property of things you need to access in your tests real quick.
Take Screenshots
Since we want to identify our screenshots, we name them. And since we want to keep them until after the end of the test is run, we’ll also have to mark them as “keep always”.
func takeScreenshot(named name: String) {
    // Take the screenshot
    let fullScreenshot = XCUIScreen.main.screenshot()

    // Create a new attachment to save our screenshot
    // and give it a name consisting of the "named"
    // parameter and the device name, so we can find
    // it later.
    let screenshotAttachment = XCTAttachment(
        uniformTypeIdentifier: "public.png",
        name: "Screenshot-\(UIDevice.current.name)-\(name).png",
        payload: fullScreenshot.pngRepresentation,
        userInfo: nil)

    // Usually Xcode will delete attachments after
    // the test has run; we don't want that!
    screenshotAttachment.lifetime = .keepAlways

    // Add the attachment to the test log,
    // so we can retrieve it later
    add(screenshotAttachment)
}
Aside: Command Line Arguments
Earlier, we set a command line argument. Here’s a quick example code on how to retrieve that in your AppDelegate.swift:
// AppDelegate.swift

func application(_ application: UIApplication,
    didFinishLaunchingWithOptions launchOptions: [UIApplication.LaunchOptionsKey: Any]?
    ) -> Bool {

    if CommandLine.arguments.contains("--libiScreenshots") {
      // We are in testing mode, make arrangements
      configStore = ScreenshotsConfigStore()
      configStore.dataPointsManager.makeExampleData()
    }

    // ...
Check if the Screenshots are There
After this step, you can already see the screen shots in the test logs. Make sure that is the case.
- In Xcode, run your new test (e.g. by pressing ⌘U)
- Open the Report Navigator and wait for your test for finish
- Click the topmost test, which is the one you just started
- Click the Quicklook icon next to one of the test’s attachment to see one of your screenshots
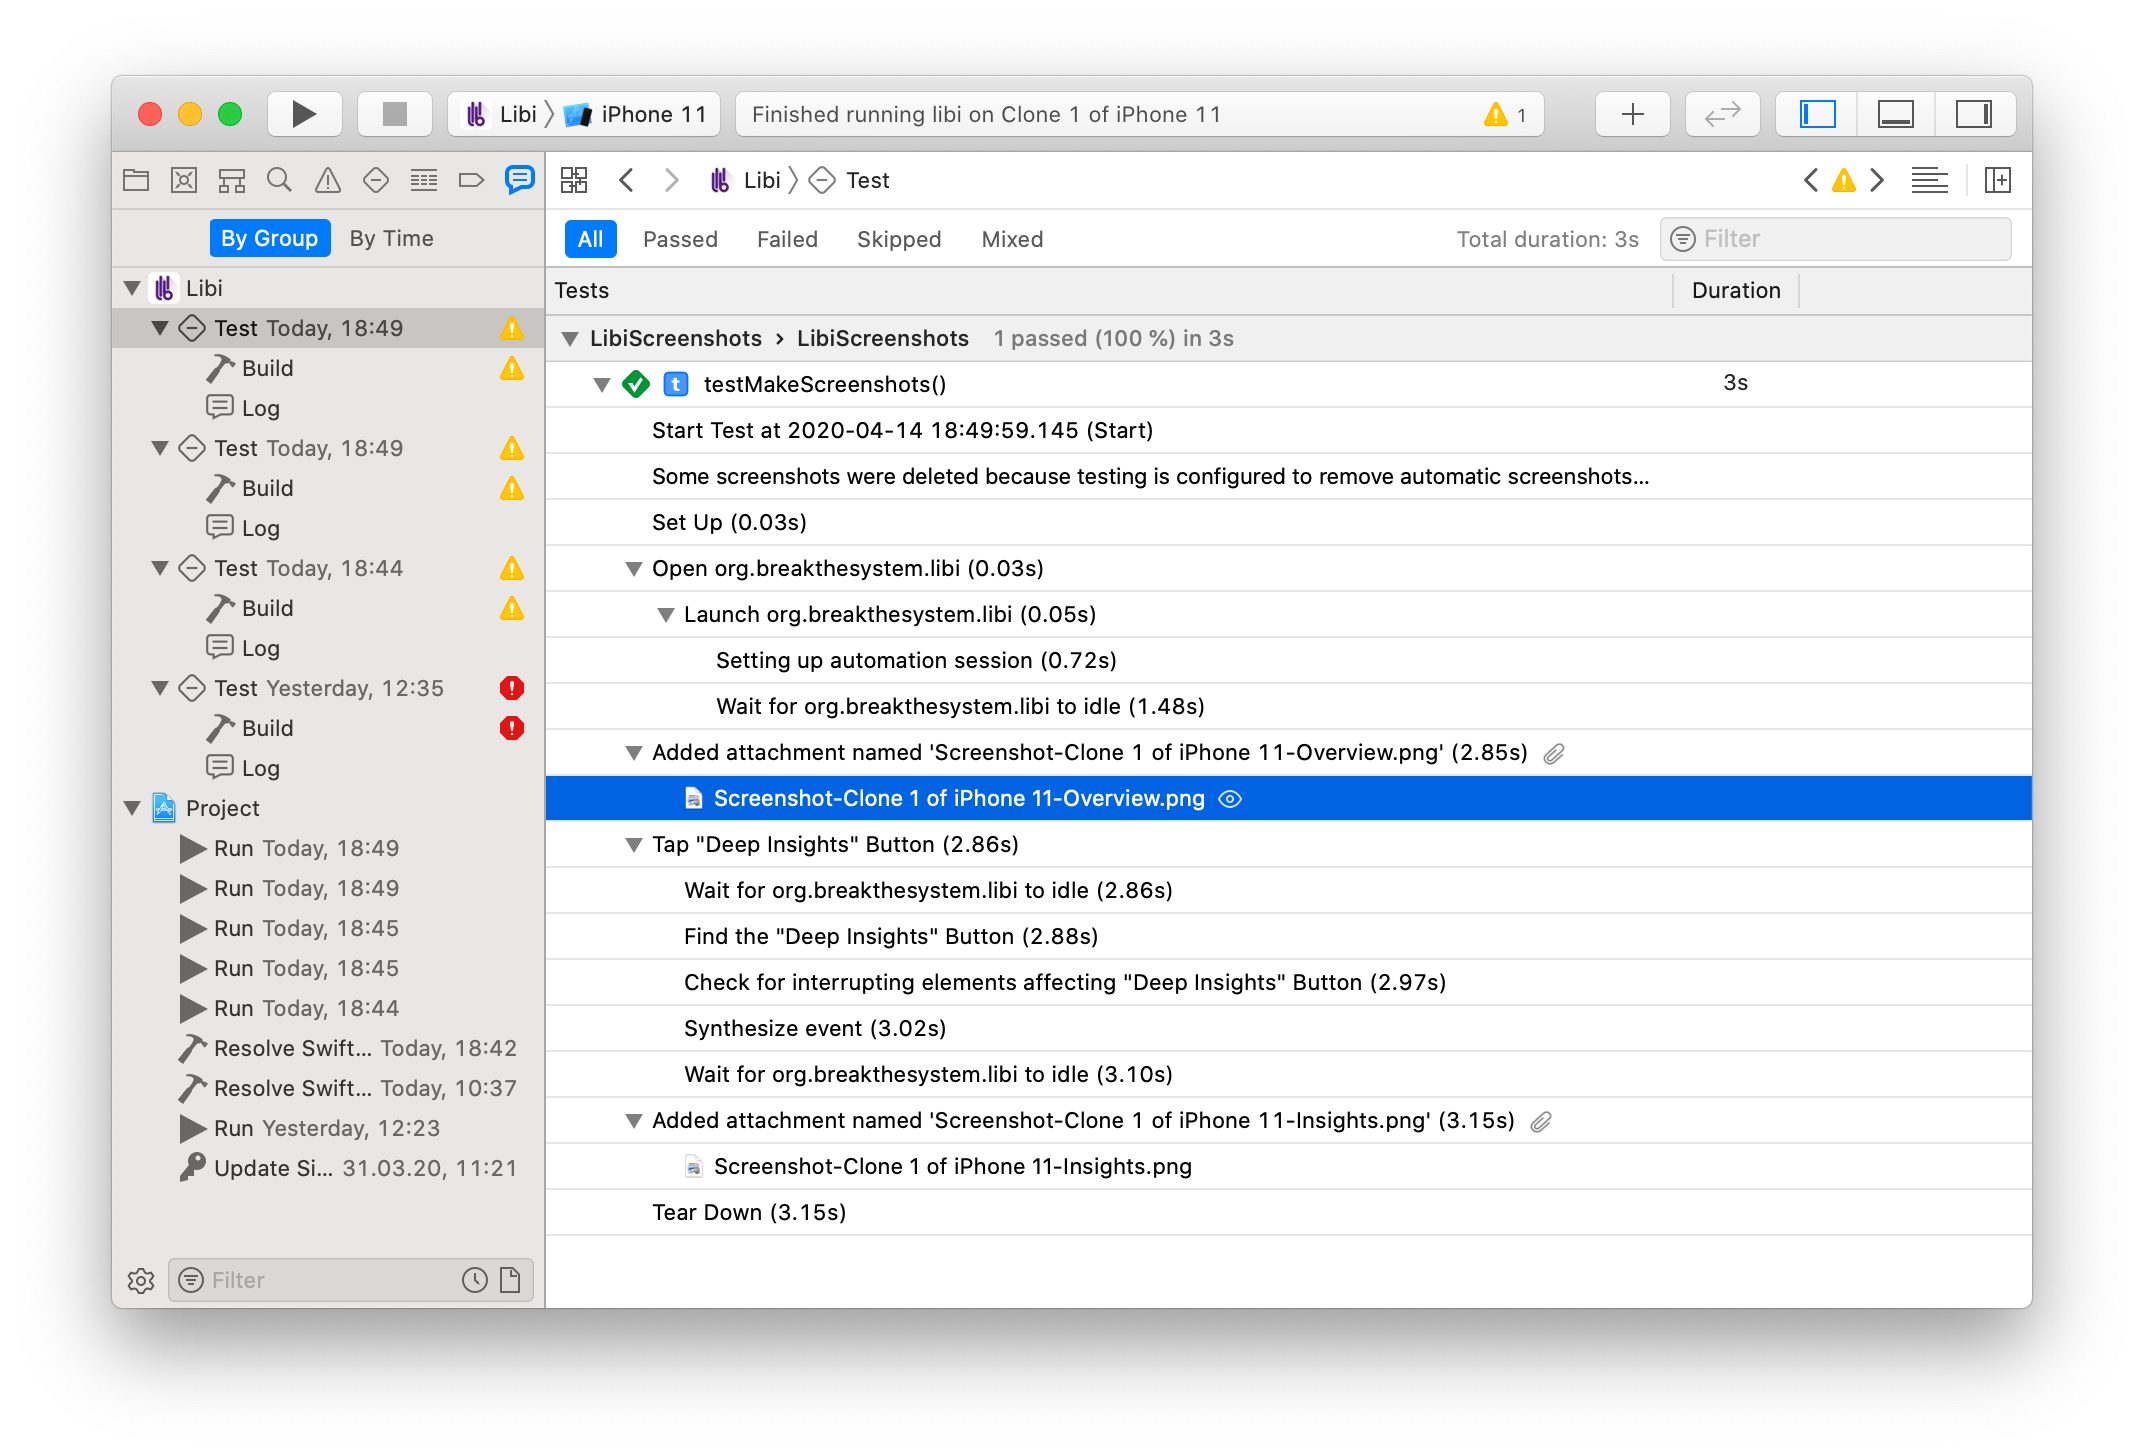
Yay, we have screenshots. That’s the hardest part done. But we’re not there yet. We need extraction, and automation.
Waiting for application xyz to idle messages in your logs, or your test workflows are generally flaky, this might be because of animations that are running. If you set up a command line flag earlier, you can use this to tell your view controllers to disable animations by calling UIView.setAnimationsEnabled(bool). Here's an example where I use my implementation of a Config Store:
override func viewDidLoad() {
    super.viewDidLoad()

    // configStore.shouldAnimateUI is true
    // except when we are running UI Tests
    UIView.setAnimationsEnabled(configStore.shouldAnimateUI)

    // ...
}
Second Step: Run Tests from the Command Line
If we want to automate things, it’s a good idea to run them from the command line. Go to your terminal, navigate to the directory that contains your .xcodeproj file and run the following command (replace scheme name and project file name)
$ xcodebuild -testLanguage de -scheme Libi -project ./Libi.xcodeproj -derivedDataPath '/tmp/LibiDerivedData/' -destination "platform=iOS Simulator,name=iPhone 11 Pro Max" build test
If the Simulator app is currently running on your system, you’ll be able to watch live as the test taps through your app. Otherwise the tests will run in headless mode.
After the tests are done, you’ll find a test result xcresult file in the derived data Path, /tmp/LibiDerivedData/Logs/Test/. It is a package, and it contains all the data we already saw in Xcode.
However, the data is not usable right now. There are no PNG files here, which is disappointing.
Third Step: Extract Screenshots from the Test Logs
The .xcresult package format is pretty complicated and I didn’t really want to parse it myself; luckily I didn’t have to. There’s a tool called xcparse which does exactly that. Install it via homebrew:
$ brew install chargepoint/xcparse/xcparse
After installing xcparse, you can use its screenshots command to extract all screenshots from a given xcresult into a folder like so (replace folder names as necessary)
$ xcparse screenshots /tmp/LibiDerivedData/Logs/Test/Run-Libi-2020.04.13_13-06-03-+0200.xcresult "~/Desktop/LibiScreenshots/"
Fourth Step: Run for each Combination of Device and Language.
And we are basically done. All we have to do now is run the xcodebuild and xcparse commands for each combination of language and simulator and collect the screenshots in a central location. Let’s dust off these bash scripting skills:
#!/bin/bash

# The Xcode project to create screenshots for
projectName="./Libi.xcodeproj"

# The scheme to run tests for
schemeName="Libi"


# All the simulators we want to screenshot
# Copy/Paste new names from Xcode's
# "Devices and Simulators" window
# or from `xcrun simctl list`.
simulators=(
    "iPhone 8"
    "iPhone 11 Pro"
    "iPhone 11 Pro Max"
    "iPad Pro (12.9-inch) (3rd generation)"
    "iPad Pro (9.7-inch)"
)

# All the languages we want to screenshot (ISO 3166-1 codes)
languages=(
    "en"
    "de"
    "fr"
)

# All the appearances we want to screenshot
# (options are "light" and "dark")
appearances=(
    "light"
    "dark"
)

# Save final screenshots into this folder (it will be created)
targetFolder="/Users/breakthesystem/Desktop/LibiScreenshots"


## No need to edit anything beyond this point


for simulator in "${simulators[@]}"
do
    for language in "${languages[@]}"
    do
        for appearance in "${appearances[@]}"
        do
            rm -rf /tmp/LibiDerivedData/Logs/Test
            echo "📲  Building and Running for $simulator in $language"

            # Boot up the new simulator and set it to
            # the correct appearance
            xcrun simctl boot "$simulator"
            xcrun simctl ui "$simulator" appearance $appearance

            # Build and Test
            xcodebuild -testLanguage $language -scheme $schemeName -project $projectName -derivedDataPath '/tmp/LibiDerivedData/' -destination "platform=iOS Simulator,name=$simulator" build test
            echo "🖼  Collecting Results..."
            mkdir -p "$targetFolder/$simulator/$language/$appearance"
            find /tmp/LibiDerivedData/Logs/Test -maxdepth 1 -type d -exec xcparse screenshots {} "$targetFolder/$simulator/$language/$appearance" \;
        done
    done

    echo "✅  Done"
done
I called this file takeScreenshots.sh and added it to the Xcode project for easier editing, inside the LibiScreenshots folder. In the repository root folder I can call it like so:
$ bash LibiScreenshots/takeScreenshots.sh
and it should run for a while and take a huge swath of screenshots!
Thanks for reading! Feel free to mention me on Twitter if you have questions or comments.
And check out Libi, my free app for tracking your mood, energy level, and libido. It's a labor of love, super privacy focused, and aims to improve your life and mental health with sophisticated analyses and awareness of where your head is at. Thanks 💙
Addenda
These are things I intend to write about in one or more follow up articles if people are interested
- Addendum Four: Creating Initial Data
- Launch Arguments and Resetting States
- Accessibility Identifiers
- Disabling Animations
- Sleeping, Swiping, and generally controlling UI Tests
- Dark Mode Screenshots (https://stackoverflow.com/questions/59447982/how-to-set-dark-mode-in-xcuiapplication-in-swift-uitests)
Sources
- Apple WWDC: Testing in Xcode
- Paul Hudson: Xcode UI Testing Cheat Sheet
- Derik Ramirez: Understanding XCUITest screenshots and how to access them
- Swift by Sundell: Getting started with Xcode UI testing in Swift
- ChargePoint: xcparse
- NSHipster: simctl
- Jeff Kelley: Fixing Simulator Status Bars for App Store Screenshots With Xcode 11 and iOS 13